


Welcome to Day 58 of the #100DaysOfDevOps Challenge! Today we will deep dive into AWS Security Groups.
What are security groups?
A security group in AWS serves as a firewall solution, primarily designed to filter both incoming and outgoing traffic associated with an EC2 instance. This filtering occurs at the TCP and IP layers, involving specific ports and source/destination IP addresses.
Security groups that you find on AWS are virtual firewalls for safeguarding your Amazon EC2 instances and controlling the inbound and outbound traffic. Therefore, you should assign an EC2 instance to a specific security group upon launching the instance. Following that, you could set up ports and protocols that are constantly available for users and computers over the internet.
The Default AWS Security Group
Every virtual private cloud (VPC) has a default security group, and each instance you launch will be associated with this default security group. This means that if you don’t do anything, such as associate a different security group, all your instances will be associated with the default security group.
By default, all protocols and port ranges from instances in the same security group are going to be allowed. Also, all traffic going to 0.0.0.0. and ::/0 will be allowed.
You can change these rules as you wish. You cannot, however, delete a default security group from your VPC.
AWS security groups: rules
The actual rule of a security group that filters traffic is defined in two tables: Inbound and Outbound. AWS security groups are stateful, meaning you do not need to add rules for return. Therefore, any rule that allows traffic into an EC2 instance, will automatically allow responses to pass back out to the sender without an explicit rule in the Outbound rule set.
Each rule is comprised of five fields: Type, Protocol, Port Range, Source, and Description. This applies to both Inbound and Outbound rules.
Inbound Rules: These outline the types of traffic that are permitted to use the resources. It serves as a virtual firewall, controlling the traffic going in and coming out of a VPC for one or more Amazon EC2 instances or other AWS services.
Outbound Rules: These regulate the traffic that is permitted to depart from the resources. The destination for incoming traffic is dealt with by outbound rules. They may be forwarded to an alternative Security Group, a CIDR block, a single IPv4 or IPv6 address, or all three.
Type: The drop-down list allows you to select common protocols like SSH, RDP, or HTTP. You can also choose custom protocols.(e.g., HTTP, SSH).
Protocol: This is typically grayed out, as it’s covered by most “Type” choices. However, if you create a custom rule, you can specify your protocol (TCP/UDP, etc.) here.
Port Range: This value will also usually be pre-filled, reflecting the default port or port range for your chosen protocol. However, there might be times when you prefer to use custom ports.
Source: This can be a network subnet range, a specific IP address, or another AWS security group. You can also leave access open to the entire internet using the “Anywhere (0.0.0.0/0)” value.
Description: This field allows you to add a description for the rule that has been added.
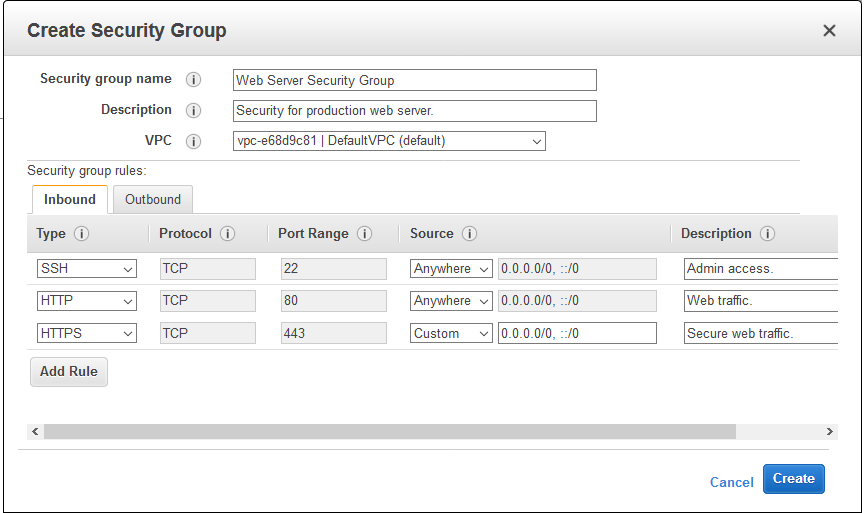
Creating a security group
You can create security groups in different ways, such as the AWS CLI or the AWS Management Console. From within the AWS Management Console, you can create a security group during the launch of an EC2 instance, at Step 6: Configure Security Group as shown below.

If you simply want to create a security group without having to launch an instance, you can follow these steps:
1. Log in to the AWS Management Console
2. Select the EC2 service
3. Select “Security Groups” from under the “Network & Security” category on the left:

4. Select the blue “Create Security Group” button
5. Enter the security group name and description
6. Select the appropriate VPC
7. Add your rules, as required, by selecting the “Add Rule” button. In the example below, I have added a rule to allow SSH connectivity from the 10.0.1.0/24 subnet

While AWS security groups are normally associated with instances during their creation, you can also add or remove them from running instances. To carry out these changes via the AWS Management Console:
1. Log in to the AWS Management Console
2. Select the EC2 service
3. Select “Instances” from under the “Instances” category on the left
4. Select the instance you want to modify
5. Click Actions > Networking > Change Security Groups
Limits
There are a number of default limits to be aware of when creating security groups. These can be defined as follows:
VPC security groups per region within your VPC = 2500
Rules per security group = 120 (no more than 60 inbound and 60 outbound)
Security groups per network interface = 5
Configuring Security Groups: Best Practices
Restrict Inbound Traffic: Avoid using the (0.0.0.0/0) setting for inbound traffic, as it can expose your cloud resources to external threats.
Limit Access: Only allow necessary IP ranges and ports to manage incoming traffic effectively.
Clean Up Unused Security Groups: Delete any security groups not in use to maintain a tidy and secure AWS environment.
Enable Tracking and Alerting: Utilize AWS tools like AWS CloudTrail for monitoring and ensuring compliance.
Which services need Security Groups?
Although most commonly used with EC2 compute instances, many AWS services rely on Security Groups.
Of these services, Amazon EC2 is one of the most widely used. You should look further into this if you are wondering how to secure Amazon EC2 in general, especially if you want to fully understand securing SSH on Amazon EC2.
But more than just Amazon EC2, all the following AWS services rely on Security Groups in some way:
Amazon EC2 instances
AWS Lambda
AWS Elastic load balancing
Databases (Amazon RDS, Amazon Redshift)
Other (ElastiCache, CloudSearch, Elastic Beanstalk, Elastic MapReduce)
Container and Kubernetes services (ECS and EKS)