


Git Workflow:
Before we start working with Git commands, you must understand what it represents.
What is a Repository?
A repository a.k.a. repo is nothing but a collection of source code.
What is a Branch?
Git branch is a lightweight movable pointer to a specific commit within the version history of a Git repository.
Branches allow developers to work on different aspects of a project simultaneously, isolate changes, and experiment with new features without affecting the main codebase.
Each branch represents an independent line of development, and developers can switch between branches to work on different tasks.
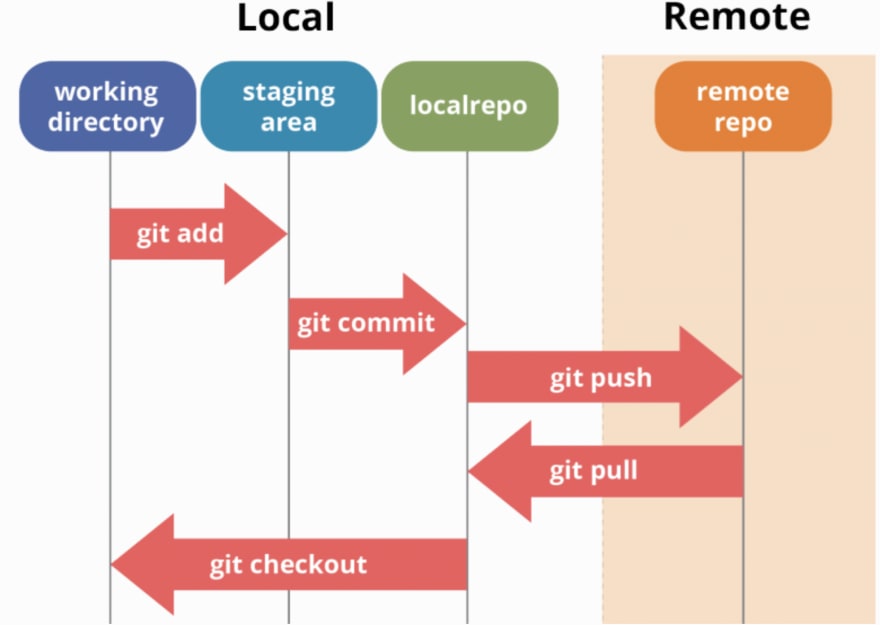
There are four fundamental elements in the Git Workflow.
Working Directory, Staging Area, Local Repository and Remote Repository.
Local Repository:
- A local repository is the copy of a Git project that resides on your local machine. You create a local repository using the
git initcommand within your project's directory, or you can clone an existing repository from a remote source.
- A local repository is the copy of a Git project that resides on your local machine. You create a local repository using the
Remote Repository:
- A remote repository is a version of your project hosted on a remote server, often on platforms like GitHub, GitLab, or Bitbucket. Remote repositories enable collaboration among multiple developers.
Working Directory:
- The working directory is the folder on your local machine where you manipulate the files of your project. You interact with these files, make changes, and then commit those changes to the repository.
Step 0: Make a GitHub Account.
If you don't already have one, you can make one here.
Step 1: Make sure you have Git installed on your machine.
Install Git on Windows
1. Download the latest Git for Windows installer.
2. Open a Command Prompt (or Git Bash if during installation you elected not to use Git from the Windows Command Prompt).
3. Run the following commands to configure your Git username and email using the following commands.
    $ git config --global user.name "Gokul"
    $ git config --global user.email "      "
Git workflows can vary depending on the development team's preferences and project requirements. However, a common and widely used workflow is the feature branch workflow. Here's a brief overview of the feature branch workflow:
Step 2:Create a Repository on GitHub:
Start by creating a new repository on GitHub. This is typically done through the GitHub website.
Go to the GitHub website (github.com) and log in to your account.
Once logged in, click on the "+" icon in the upper-right corner of the page and select "New repository".

Clone the Repository:
Open your terminal or command prompt on your local machine.
Navigate to the directory where you want to store the repository.
Use the
git clonecommand followed by the URL of your repository on GitHub. For example:
Create a Branch:
Before making changes, create a new branch for the feature or bug fix you're working on. This helps isolate changes from the main branch.

Make Changes:
Make changes to your code and commit them locally.

Add files to the Staging Area for commit:
The staging area, also known as the index, is an intermediate area between your working directory and the Git repository. It's where you prepare changes before committing them. You use the
git addcommand to stage changes.$ git add . # Adds all the files in the local repository and stages them for commitBefore we commit let’s see what files are staged:
$ git status # Lists all new or modified files to be committedCommit Changes you made to your Git Repo:
A commit is a snapshot of the changes you have made to your project. Commits create a new point in the version history of the repository. You use the
git commitcommand to save staged changes.$ git commit -m "First commit"
Add a remote origin and Push:
Now each time you make changes in your files and save it, it won’t be automatically updated on GitHub. All the changes we made in the file are updated in the local repository. Now to update the changes to the master
Authentication:
If this is your first time pushing to the repository, Git may prompt you to enter your GitHub username and password or authenticate using an access token.
  $ git remote add origin remote_repository_URL
  # sets the new remote
Now the git push command pushes the changes in your local repository up to the remote repository you specified as the origin.
Once the push is successful, go back to your repository on the GitHub website.
Refresh the page, and you should see the changes you made reflected in the repository files.

Conclusion:
As DevOps engineers, Git and GitHub are your allies in building great software. Git helps you keep track of changes, while GitHub makes it easy to collaborate with others. Together, they're a powerful duo that helps you turn ideas into reality. So don't be afraid to dive in and start using Git and GitHub today!